
The Ultimate DIY Candy Buffet Guide + INFOGRAPHIC
Introducing:

A Definitive Set of Time-Tested Tips that Really Work —Including Step-by-Step Infographic (here) to Help You Start Building Your Candy Buffet and Impressing Your Guests.
The biggest reason people say they can't have a candy buffet at their event is money. They can't afford to pay a professional to build one. Solution? Build your own using bulk candy and these easy-to-follow guidelines and you will save hundreds of dollars (or more)!
Use this Infographic
There's a lot of information down below. So you don't forget, we've simplified it into this step-by-step infographic. Share it, embed it (code below), print it, use it to create the candy buffet of your dreams.

Share this Infographic On Your Site
Candy buffets are like something featured in a magazine.
If you've ever oo'd and aah'd at these creative high-design displays, you might also have been intimidated. It seems so complex. We'll simplify it for you.
Our candy experts have put together the definitive guide on how you can turn bulk candy into an artful masterpiece.
Making a stunning candy bar takes some planning, smart decisions, and crafty choices. In order to plan it right, follow the steps below.
1. Get a Headcount

When you're hosting any event, getting an accurate headcount is key to determining how much food you'll need to prepare.
So, how much candy do you need?

If you've got that many bridesmaids and groomsmen, you'll need a lot. :) –CREDIT: Square Peg Images
After you count heads, calculating ratios is the next piece of the hosting puzzle. Food ratios are basically how much of each food you should provide for each guest. For instance, if you're serving steak, the recommended ratio is 6-8 ounces per person.
For alcohol, well that depends on what type of friends you have…

Candy Ratio:
For candy, it's about 1/2 pound per guest.
1/2 pound
X number of guests
= total pounds of candy you'll need for your candy buffet
So, if you're expecting 100 people, you should buy 50 pounds of candy – minimum. It may sound like a lot, but 1/2 pound of candy is only a little heavier than an apple.
You may have noticed the word minimum above. You can always go bigger and more extravagant. But stay on the path young grasshopper. We will guide you.
2. Determine Your Party Demographic

What kind of party are we having?
A party for a three-year old is very different than an "employee of the year" party. Think about your party demographic when planning a candy bar.
Some possible age variations you could plan for:
Multi-Generational
Weddings, family birthday celebrations and anniversary parties are types of events that normally skew toward this category. If you're having people of all ages, you can mix in classic and modern candies that will please everyone.

For the older crew (70-100), try old fashioned candy sticks or butterscotch candies they may have found in sweet shops when they were little.
For the middle aged guests, try a mix of classy bulk candies like chocolate-covered espresso beans, snack sized chocolate bars, or Charms lollipops.
Please the younger kids with exciting candies like Fun Dips or gummy sharks.
Kids
First of all, they might eat more than 1/2 a pound each. Adjust accordingly.
Kids love foods you can play with and that represent their favorite shows, games, and characters. Some popular kid candies are princess, pirate, and cartoon-themed.
They also love anything they can wear like candy necklaces or Flash Pop Rings. Whenever you're doing a candy buffet for kids, assess the choking hazard and choose candies that are safe for them to eat!
Corporate / Adults only
Corporate events are a bit tricky because they are slightly multi-generational, but professional too. Depending on the type of company you work for will factor into your candy bar decisions.

A good place to start is with color. You can shop for wholesale candy by color to match your company's logo or your wedding colors. Then, just make sure you choose a variety of shapes, sizes, and flavors to create an interesting display with lots to offer.
Your style, decorations, candy choices, and candy quantities will vary drastically depending on the type of event you're having—and so will the variety of goodies you offer.
How Much Candy Variety Should I Have?
Good question. It depends.
For an event of 100+ people, it's smart to provide 8-10 different types of goodies. They can be all candy or a combination of candies, baked goods, confectionary delights. Not only does it add visual interest, but provides a lot of choices for your guests. If you're having a small wedding, corporate event, or anniversary party for 100 guests or less, 5-8 types of candy should suffice.

Wrapped vs Loose?
When you're choosing your 5-10 sweet and savory treats, also give some thought to how much loose candy versus individually wrapped edibles you want to provide.
Individually wrapped can be good for kids parties where handling might be a concern. Whereas loose bulk candy can help to give an illusion of more offerings while taking up less space than 100 giant lollipops.

Personalized or high-quality wrapped items – like candy bars with custom labels – can get expensive. Keeping those to a minimum will help keep costs down.

If you to want to offer individually wrapped sweets, limit them to one per guest. That'll ensure that everyone has a personal treat, but it won't overwhelm your candy buffet.
3. Take Home Bags?

The intent of your candy buffet matters. Whether you're using your candy bar as a wedding favor station or dessert at a birthday party, you'll need specific containers to match. For example, if people are taking sweets home, include cellophane bags or mini take-out containers they can scoop treats into.
If candy is going to be eaten on the premises, think about popcorn baggies or snack-sized plates that can be tossed in the trash.
Size matters too. Candy buffets featuring large candies should have larger containers to accommodate. On the other hand, small, loose candy will need much tinier packaging.
You should also remember that the bigger the container, the more people will take! Match the containers to portion size (1/2 pound per guest), so that the first 10 people in line don't walk away with half the display!
4. Pick A Spot, Pick a Size

Where is your glorious candy shrine going to be located?

If it's on a table in your living room, make sure it'll fit the space. If you're working with a wedding planner at a venue, get measurements, so you can plan accordingly. And do plan. Set the empty containers on the table and see if it looks good. If you're going for an abundance look, make sure the table isn't too big. Too little candy on a huge table can look sparse.
As long as you know your design vision ahead of time and have a place that will give you ample room to set up shop, you'll be as good as gold.
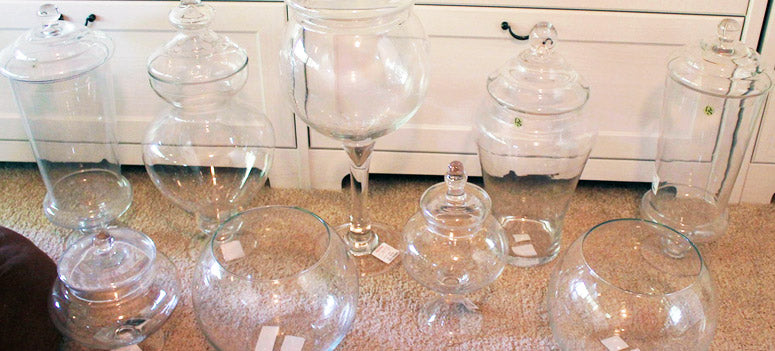
Some things to consider when choosing a candy buffet location are the types of containers you'll be using. Tall vases will need a stable foundation where they won't be jostled, so your rickety side table probably isn't the best choice. Smaller apothecary jars and bowls will take up a lot of table room, so make sure the footprint will fit your vision. You can find out how to find cheap jars and vases here.
Keep in mind you will want to use a tiered strategy; we'll get there in a sec. First, lets talk color.
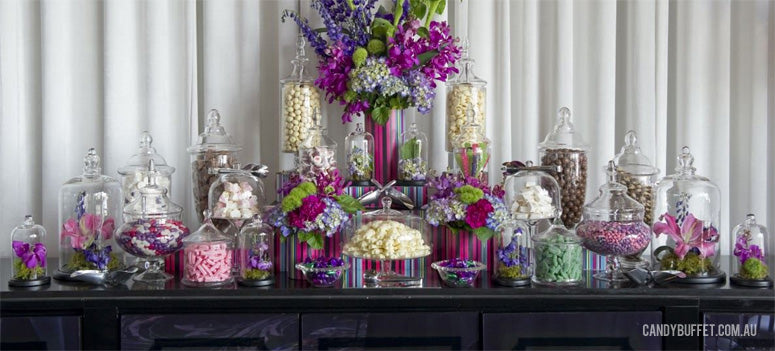
5. Choose Your Colors And Theme

This is where the fun and a Pinterest-worthy candy bars begin—with color palettes!
Cohesive colors are key to an impressive and put-together candy buffet. When done right, color combinations can transform your candy bar into a chic, sophisticated, whimsical, preppy, sleek, or festive decoration—as well as a tasty arrangement.
Even if you're not fantastic at choosing colors, remember this rule: stick to four! One color should be dominant, one should be an accent, and two should be neutral enough to complement the others. Here are some popular color palettes to get you started:
If these hues aren't what you're looking for, here's a fun resource with thousands of color combinations that can inspire your candy buffet design.
Now, it can be tough to find candy in super specific colors. M&Ms, Sixlets, and Jelly Belly do a good job, especially with pink and blue. But most candy is in relatively basic shades. That's ok! Candy is fun and brightly colored. Use your accent decorations to emphasize the unique colors in your palette.
6. Choose Your Candy

Get ready to drool because it's time to pick your candy!
While we say candy, your buffet can include anything edible—from popcorn to donut holes, cupcakes and more. By this point on the list, you'll know exactly what type of event you're having, how many people are coming, the ages of your guests, the intent of your display, and your color theme. That will make choosing candy types MUCH easier.
How many jars will 10 pounds of candy fill?
An important question. You chose the types of jars you want. Now you need to know how much candy it'll take to fill them up.
Bulk candy will usually come in 2, 5, or 10 pounds (or more). Since they all vary, we created a few videos to help illustrate candy volume:
Whether you want bulk candy, individually wrapped candy, designer sweets, or display candy, you can obviously buy thousands of varieties at wholesale prices from CandyStore.com. If you don't know the exact sweets you want, but know your colors, start with the Shop by Color category to make your hunt simpler. You can also narrow down candy choices by types, brands, holidays, events, and flavors.
Once you decide on your candy menu, you'll have a better understanding of how it should be served. For instance, if you're featuring loose bulk M&Ms, you'll need a scoop to keep people's hands out of the jars. If you're putting a bunch of individually wrapped cookies in a jar, a pair of cute tongs would give your buffet a fancier feel. If you're setting mints out in a candy dish, hands will do just fine. Just remember that serving-ware is just as important as the containers your candy is going to be displayed in.
7. Set Up Your Zones

Your table should have a foreground, middle-ground, and background. To achieve the best candy display, you should arrange your containers much like you would people in a photo—from tallest to shortest. By putting the tall stuff in the back and the shorter containers in the front, you'll create visual interest and functional design. Here's what to do for each zone:
Back Zone The tallest containers should go at the back of the table. By putting them toward the back, it'll keep vases and taller items from blocking view and reach of shorter and smaller containers. There are a couple things to watch out for here: tip risk and out-of-reach items.
If you have a long skinny table, this works best for tall candy containers. Since they're tall, people already might have a little bit of an issue reaching them, but if they're too far back, they'll be out of reach. They could also tip if someone has to pull a vase toward them to get at the candy. You don't want a candy avalanche, so this is something to watch out for!
Don't have tall containers or vases? Don't fret. To achieve the high-low look, there are a few tricks you can stuff up your sleeve. For one, you can gather hardcover books and magazines and stack them on your bare table to the height you want your candy containers. Then, lay a table cloth on top to hide the props. You can also make the props part of the design. Here's a tip: if you're going for a vintage look, use old hardcover books on the surface of the table to boost candy containers. It'll be a functional and fun design element your guests will notice.
Middle Zone This is the "Goldilocks" portion of your candy display—"not too high, not too short." You'll want to find containers that are about half as tall as your background vases to keep balance and functionality on the table. Again, you can use the book and magazine trick to prop up shorter vases to a medium height. Or, you could use baskets, bowls, jars, tin canisters, and bubble gum machines.
Front Zone This is your flattest zone. Since you already have bowls in the medium zone, try using trays and other low-profile servers in this area. Reserve your scoop-able bulk candy for the back and middle zones and reserve the front zone space of individually wrapped candy you can lay flat. You won't have much depth to implement scoop-able candy here, so something people can grab with their hands is best.
8. Now Decorate!

Now, you can add some flair. Just remember to stick with your color theme and event vibe when choosing embellishments! Decorative items you can use are banners, knick-knacks, flowers, confetti, ribbon, balloons, figurines, action figures, framed photos, tablecloths, doilies, bows, ribbon, and more. Your decorations should go wit the candy, so choose items that amplify and complement rather than compete. Here are some decoration ideas that are functional and stylish:
Shabby Chic
This person used an old drawer as a candy display case! That's smart and cheap. You could use something you have at home or go out to your local antique and thrift stores to hunt something down. It represents a certain aesthetic and serves as a functional container at the same time. That's a double win.
Girly
Glass is the common element in these vases and really brings the display together. It doesn't matter that they're different shapes and sizes, they all go together because of this shared material. The designer of this girly candy display took the cohesion a step further by adding matching polka dot ribbon to the vases. This is a great idea since it's cheap, removable, and easy to assemble. The best thing about using glass vases is that you can give them a totally different look every time, since they match every style.
Rustic
You don't have to choose a sweets only candy bar. Popcorn, cake pops, and other edible displays are equally as charming and delicious. This style incorporates everything you'd find at the movies—from popcorn to boxed candies. The thing to note here is the display itself. The designer used thematic vessels for the snacks and a rustic cart to house it all. Your candy buffet doesn't have to sit on a table, so think outside the box!
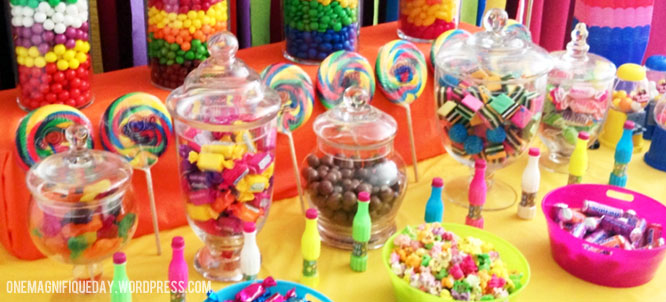
Kid-Friendly
If you're doing something for kids, then your palette can be brighter and less matchy-matchy. After all, it's this colorful chaos that gives a kids' candy bar its whimsy! When going for a mismatched look, the more variety, the better. Things start to go together when enough doesn't go together. It sounds asinine, but it's true! When designing something like this think function and fashion. The designer of this wonderful display used candy "pompoms" as a decorative element that's also edible. The backdrop was then able to be kept relatively simple—it's just large sheet paper, paper fans, and some paint.
9. And Then Make Sure to Photograph and Share your Creation!
Before you unleash your guests on your fabulous candy buffet, take a photo! Trust us, you'll want to preserve your hard work and remember how great your event was with a picture. We'd also love to see the DIY candy bars you created with this tutorial. Please come back and share your candy masterpiece with us in the comments section to inspire fellow candy lovers and show off your skills.
We wish all of you good luck in your candy bar building and can't wait to see your success!
Did you like this article? If so please share on your social network of choice.
Did we leave anything out? Comment us anything you might add or how we can make this guide even better.
Share this post
- Tags: Candy Buffets